Developing games with Ruby and MiniGL: Part 7 - a complete game!
Hi there, friends. Yes, it’s been a little while since the last post… However, lots of interesting things happened, including the completion of my most ambicious game project to date, “Super Bombinhas”. It’s a platform game, inspired by the classics Mario and Donkey Kong - anyone who played these know that they are true gems of their time.
As you can imagine, the game was built with Ruby and MiniGL - using all that I presented you in the previous posts and a lot more… More recently, I released the game on Steam, and because it’s one of the few complete games written in Ruby, it even caught the attention of the language’s community, and I was invited to record a podcast talking about it!
Although it’s on sale on Steam, the game is open source and fully available on my GitHub. Installers can be downloaded for free on itch.io. But let’s get to the point: exploring a bit of Super Bombinhas’s code and talking about the algorithms, techniques and MiniGL’s features that were leveraged to build a full game.
High-level architecture
First, let’s get acquainted with how the game code is organized - download the GitHub repository to your machine in order to follow easily. All of the code files are at the root of the repository, as well as the data folder, which is the default MiniGL folder for the game assets (images, sounds, etc.). Inside this folder, the assets are also organized in subfolders that follow MiniGL’s conventions, so that I don’t need to do any configuration in order to easily load the resources (see part 2 to recall how to load resources with MiniGL).
The entry point is the game.rb file, where we control the current state of the game: here we check if the player is at the menu, or at the world map, or in an actual level, and the classes responsible for each of these parts are called to make most of the work. This logic can be observed in the following snippet of the update method:
    if SB.state == :presentation
      [...] # code that controls the presentation logic, which is implemented in-place
    elsif SB.state == :menu
      Menu.update
    elsif SB.state == :map
      SB.world.update
    elsif SB.state == :main
      status = SB.stage.update
      SB.end_stage if status == :finish
      StageMenu.update_main
    elsif SB.state == :stage_end
      StageMenu.update_end
    elsif SB.state == :paused
      SB.check_song
      StageMenu.update_paused
    elsif SB.state == :movie
      SB.movie.update
    elsif SB.state == :game_end
      Credits.update
    elsif SB.state == :game_end_2
      if SB.key_pressed?(:confirm)
        Menu.reset
        SB.state = :menu
      end
    elsif SB.state == :editor
      SB.editor.update
    end
There are various references to SB, which is a class with static methods that give access to various important elements of the game, making it easy for them to be accessed from anywhere in the code. This is not necessarily an example of best practices, but it works well for a medium complexity project like this - for bigger projects, you’d be better off using some design pattern like dependency injection, for example. This class is declared in file global.rb, along with other elements that need to be accessed from various places (in other words, need global access, hence the name). The SB class uses an interesting Ruby syntax to automatically make all methods be declared static:
class SB
  class << self
    # declaration of methods and variables as for an instance
  end
end
Everything declared inside the block started with class << self will be accessed directly from the class.
Now, let’s enumerate the main classes that control the different game states (each one is declared in the file with the corresponding name):
Menu- controls the game’s start menu, where you can find instructions, options, saved games and the option to start a new game, etc.World- controls the world map, where the player can select the level that he will play.Stage- controls the overall state of a level.Section- each level (stage) is broken in sections, with this being the class responsible for controlling a specific section. This is probably one of the most interesting classes of the project.
StageMenu- controls the in-game menu (when the player pauses) and other UI elements that show up during gameplay.
World classAnother general architecture trait of the game is that most classes include an update and a draw method, just like the class that represents the game window and serves as an entry point. Usually, the update of a class calls the update of the objects it contains or references, from the top-most level (the SBGame class) to the most specific classes (like those that represent an enemy or an item); the same behavior is observed in the draw methods.
Extending GUI elements
In the file menu.rb you’ll find the declaration and utilization of various GUI (graphical user interface) elements - some provided by MiniGL, like Button, and others defined in the game project, like SavedGameButton and MenuText. The last ones are interesting examples of extensions to MiniGL’s GUI elements. Most of these extensions are declared in a different file, form.rb, with the most notable one being FormElement. It’s a module included by all the menu controls that gives them a shared functionality: the visual transition effect that happens when the user changes screens (all controls move to the side with a deaccelerated movement). To better understand what this is all about, try running the game with ruby game.rb (you’ll need the minigl gem installed, version 2.3.5 or greater). Below is the relevant code:
  def update_movement
    if @aim_x
      dist_x = @aim_x - @x
      dist_y = @aim_y - @y
      if dist_x.round == 0 and dist_y.round == 0
        @x = @aim_x
        @y = @aim_y
        @aim_x = @aim_y = nil
      else
        set_position(@x + dist_x / 5.0, @y + dist_y / 5.0)
      end
    end
  end
The other classes add defaults like, for instance, the buttons’ image, the font, and even the default position (most buttons appear horizontally centered on the screen), such that these settings don’t need to be repeated in the code for every control, which would be needed if we just sticked to using MiniGL’s classes.
The core of the game: Stage and Section
These two classes (and a bunch of smaller ones) are responsible for the gameplay. Super Bombinhas, as mentioned earlier, is a platform game, which means you move your character through a level, usually from left fo right, jumping, avoiding or attacking enemies and collecting items. The movement is physics-based (a concept that we introduced in the last post), but it’s very carefully polished to feel comfortable in the player’s hands.
Each level is a grid and the elements are initially placed inside the cells. In order to achieve that, the Map class from MiniGL is used, which makes things pretty easy. For example, as some sections are large, we don’t want to draw every tile (an individual component of the scenario that occupies one cell in the grid) at the same time, in order to not compromise performance. With Map’s foreach method, that’s easy to deal with. Check out the snippet below, from method draw of the Section class:
    @map.foreach do |i, j, x, y|
      b = @tiles[i][j].back
      if b
        ind = b
        if b >= 90 && b < 93; ind = 90 + (b - 90 + @tile_3_index) % 3
        elsif b >= 93 && b < 96; ind = 93 + (b - 93 + @tile_3_index) % 3
        elsif b >= 96; ind = 96 + (b - 96 + @tile_4_index) % 4; end
        @tileset[ind].draw x, y, -2, 2, 2
      end
      @tileset[@tiles[i][j].pass].draw x, y, -2, 2, 2 if @tiles[i][j].pass
      @tileset[@tiles[i][j].wall].draw x, y, -2, 2, 2 if @tiles[i][j].wall and not @tiles[i][j].broken
    end
The foreach will automatically iterate only through the tiles that are currently visible on the screen (which is controlled by the map’s camera, another property of Map), passing the column and row of the grid (i and j) and the coordinates in the screen where that cell should appear (x and y) as parameters to the block. Thus, we can simply access position [i][j] of the @tiles matrix to check which type of tile is there, and draw it in position x, y of the screen.
By the way, I forgot to mention, but Super Bombinhas comes with a level editor, and it makes clearer that the levels are structured in a grid:
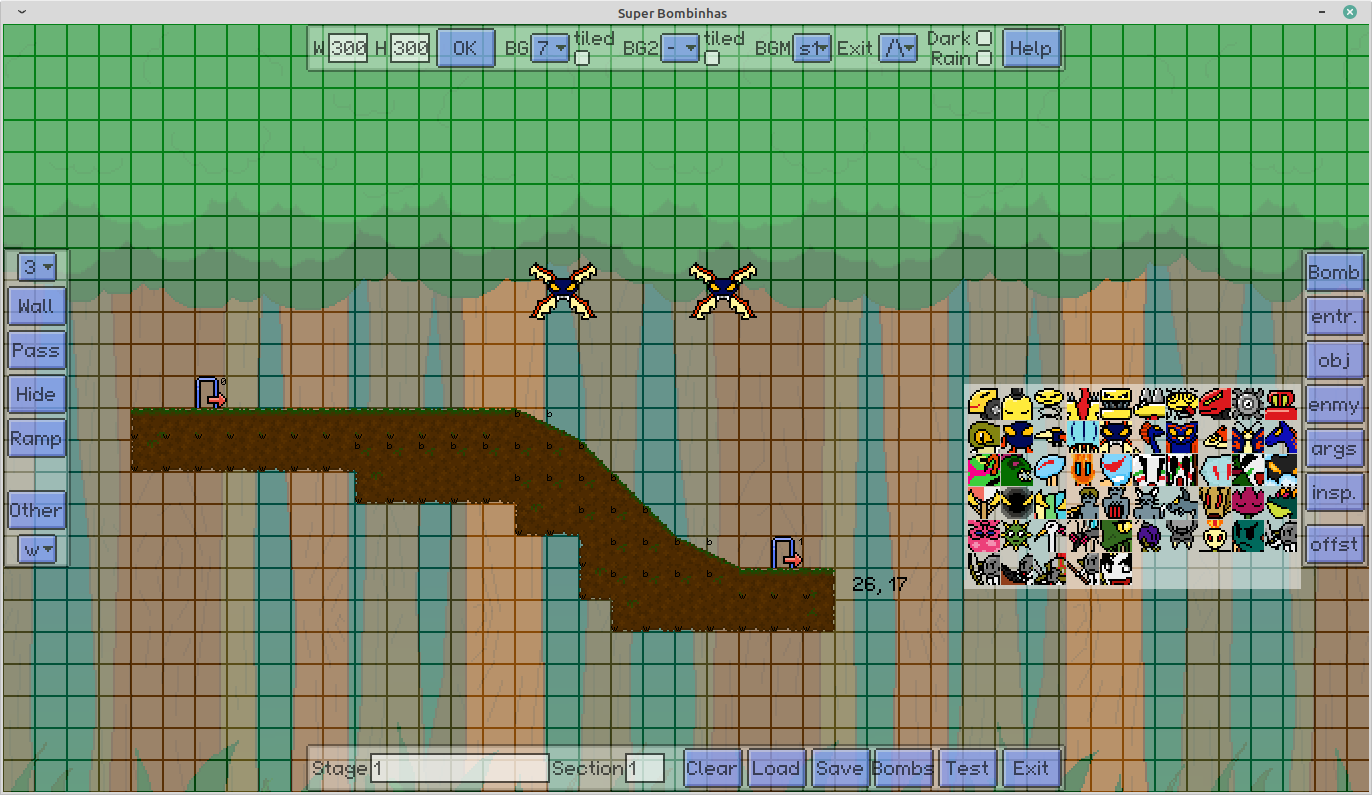
The tiles are static elements, composing the level’s scenario. The dynamic elements (enemies and objects that the player can interact with) are instantiated in a different way, leveraging an interesting feature of the Ruby language: the fact that even classes are objects! In the file that encodes a section, the elements are marked by sequences like @1, @2, etc., where the number after the @ is mapped to an enemy or interactive object class, and that class is dynamically instantiated - the constructor is called from a variable that stores the class, instead of from the class name itself. To illustrate that, let’s take a look at the snippet below, from method start of class Section:
    @element_info.each do |e|
      @elements << e[:type].new(e[:x], e[:y], e[:args], self)
    end
Observe the call to new, the constructor, from e[:type], a hash entry that was previously populated with a class. In order for that to work, of course, all the enemy and interactive element classes have to have the same constructor signature (i.e., the constructors must all receive the same parameters). The mapping of numbers to classes can be found in the constant ELEMENT_TYPES, in the same file. The implementation of these classes is distributed among the elements.rb, enemies.rb and items.rb files. There are lots of interesting things in those files too, but talking about all of them would make this post unbearably long. :P
Ensuring movement performance
Super Bombinhas is a game featuring physics-based movement, and that implies the existence of collisions. The character can collide with the floor, the walls, the ceiling and even some dynamic elements like elevators and some enemies. The enemies, on the other hand, also need to check collision with floor and walls in many cases. Now, imagine a really large stage, with hundreds of enemies and elements and thousands of solid tiles (floors, walls and ceilings). If the game tried to, in each frame (which corresponds to roughly 16.7 milliseconds since the game’s target FPS is 60), check collision between the player and each of these tiles and between some of the enemies and the tiles as well, that would require a lot of processing power… For an interpreted language such as Ruby, it would result in a noticeable performance degradation.
With that in mind, an important optimization needed to be done in order to achieve a steady 60 FPS even on low-end machines (basically any graphics card and an average CPU are enough to run the game smoothly). When checking for collisions, only the “collidable” blocks that are near the player are taken into account. That’s another advantage of the grid system: it’s trivial to locate the blocks around a certain position of the map. This works based on the premise that the player’s speed is never too high, which means it will never collide with a block that was far from it after a single frame of movement. The logic for that optimization can be found in method get_obstacles, also from the Section class:
[...]

    # offset_x and offset_y indicate how many grid cells of distance will be considered for collision checking
    offset_x = offset_y = 2
    if w > 0
      x += w / 2
      offset_x = w / 64 + 2
    end
    if h > 0
      y += h / 2
      offset_y = h / 64 + 2
    end

    # i and j are the row and column of the grid where the player is located
    i = (x / C::TILE_SIZE).round
    j = (y / C::TILE_SIZE).round
    ((j-offset_y)..(j+offset_y)).each do |l|
      [...]
      ((i-offset_x)..(i+offset_x)).each do |k|
        # for each tile in this area, check if it's "collidable"
        [...]
[...]
Thus, only the solid tiles from this small area around the player (along with a few dynamic obstacles such as elevators) are passed to the move method (provided by MiniGL’s Movement module) of the player (you can read more on that in previous posts and in MiniGL’s documentation).
Final thoughts
That’s all for today, folks! The Super Bombinhas source code still encloses lots of other notable parts, but it’s just too much for a single blog post… Not a surprise, given that it’s been many years dedicated to its development, and the final result packs a lot of content. Check it out for yourself by downloading the game or buying it on Steam. And, after exploring more of the game itself, remember that the code will always be available for you to find out how a specific mechanic was implemented.
Happy gaming/coding!