Developing games with Ruby and MiniGL: Part 3 - animation and collision
Hello and welcome to another post in the series on game development with Ruby and MiniGL!
Today, we’ll turn our game prototype into something closer to a real game, with some animation and collisions.
Important: To follow this post, you must update MiniGL to version 2.2.5 (more recent than the two previous posts) or later. For that, run these commands in the terminal/command prompt:
gem uninstall minigl
gem install minigl
Animation
You must have already noticed that most games don’t show only static images, but rather “moving images”, i.e., animations. These are nothing but sequences of images alternating quickly, creating the impression of movement. As the various images that compose an animation tend to be similar (with similar sizes), a technique commonly used in games is combining all of them in a single image and drawing different “pieces” of this image each time. This is the concept of a sprite (the image that combines all phases of the animation is a spritesheet).
The MiniGL library offers a class which specializes in dealing with this kind of animation, the Sprite class. Let’s create an animated object in our game, but first we’ll need the spritesheet:

Include the image above in the “data/img” folder of your project, with the name “face.png” (replace the image from the last post).
An important notice: the Sprite class from MiniGL only works with spritesheets where all “pieces” have the same size, and are positioned in a grid, i.e., the image is composed of rows and columns. For example, the image above is composed of two rows and two columns, each “cell” measuring 100 x 100 pixels. This amount of rows and columns will be used to initialize the sprite. Revisiting the “game.rb” file from the previous post:
...
class MyGame < GameWindow
  def initialize
    ...
    @sprite = Sprite.new(0, 0, :face, 2, 2)
  end
...
We’re creating an instance variable called @sprite, which receives an instance of the Sprite class, initialized with the following parameters:
- The first two (zeroes) are the x and y coordinates. The sprite stores its position, so we won’t need the
@xand@yvariables in theMyGameclass to control the drawing position anymore. - The third,
:face, is an identifier of the image to be used. The idea is the same as in theRes.imgcall, but in this case, the ‘.png’ extension will always be assumed. - The fourth and fifth are the amount of columns and rows (in this order) that compose the spritesheet.
If we now change the draw method to the code below:
...
  def draw
    clear 0xffabcdef
    @sprite.draw
  end
...
we will already see the image being drawn in the top-left corner, but static as before. That’s because we haven’t actually animated the sprite, that is, we didn’t command that the “pieces” being drawn changed over time. Let’s do it now, in the update method:
...
  def update
    ...
    @sprite.animate([0, 1, 2, 3], 5)
  end
...
Add this line, save the file and run the game (ruby game.rb in the terminal/command prompt, inside the project’s folder). You will now see that the image is animated! Quite simple, huh? Now let’s thoroughly analyse the line of code we just added. It is a call to the animate method of the sprite. This method takes as first parameter an array/list of numbers (delimited by brackets) and as second parameter another number. The first parameter is a sequence of indices of the “pieces” of the spritesheet. Our spritesheet has 2 rows and two columns, which makes 4 pieces in total, and these can be indexed from 0 to 3. This indexing flows from left to right and from top to bottom, so the top-left corner piece has index 0, the top-right one has index 1, the bottom-left one has index 2 and the bottom-right one is 3. Therefore, we’re indicating with this parameter that the pieces should be showed in this order, continuously. Finally, the second parameter is the interval, in frames, between each change in the index. As the game runs at roughly 60 FPS, this indicates that the image will be changed 12 (60 divided by the interval of 5) times each second, approximately.
We have covered continuous animations, but it is also common needing to show an animation that runs only once, for example when the character executes an action as result of a user command. Let’s increment our spritesheet with an “eye blink” animation to demonstrate that.

The two new pieces of the image, as explained before, will have indices 4 and 5. The idea is to animate using these indices when the user presses a key (for instance, the space bar):
...
  def initialize
    ...
    @sprite = Sprite.new(0, 0, :face, 2, 3)
    @blinking = false
  end

  def update
    ...

    if @blinking
      @sprite.animate_once([4, 5], 7)
    else
      @sprite.animate([0, 1, 2, 3], 5)
      if KB.key_pressed?(Gosu::KB_SPACE)
        @blinking = true
        @sprite.set_animation 4
      end
    end
  end
...
Ok, lots of new things in here. Let’s analyse them in order:
- The initialization of the sprite (
@sprite = Sprite.new...) has been changed to reflect that the spritesheet now has 3 rows (last parameter). - We created an auxiliary variable to control the animations,
@blinking, which will indicate when the “blink” animation must run. - In the update method, we first check the variable mentioned above and, if it’s true, we call the
animate_oncemethod, that works likeanimate, but it only runs the animation once, and stops changing the image index after the last position of the array is reached; if the variable is false (initial state), we run the previous animation and check if the space bar was pressed. If it has been pressed, we change the control variable to indicate that the blink animation should run and call theset_animationmethod with 4 as parameter - this methods immediately changes the current image index to the one provided and resets the timer that controls index changes.
If you test the game now, you will see that it starts like before, but if you press the space bar, it will show the blink animation and then the image will stop - because we’re using animate_once, and we’re not resetting the control variable to indicate that the blink animation has finished. Fortunately, it is easy to adjust that:
...
  def update
    ...

    if @blinking
      @sprite.animate_once([4, 5], 7) do
        @blinking = false
        @sprite.set_animation 0
      end
    else
      @sprite.animate([0, 1, 2, 3], 5)
      if KB.key_pressed?(Gosu::KB_SPACE)
        @blinking = true
        @sprite.set_animation 4
      end
    end
  end
...
All we needed to do was add a block after the animate_once method call (in Ruby, any method can receive a block after the parameters, which is delimited by “do” and “end” or by braces). This block will be run after the animation finishes. In this case, we’re setting the @blinking variable back to false and resetting the animation timers once again, as well as changing the index to 0.
Running the game now, you will see that, after the blink, the sprite returns to the original animation. However, the return is a little “rough”, which we can fix by simply adjusting the indices:
...
@sprite.animate_once([4, 5, 4], 7) do
...
Perfect! That’s about ir for animations. We’re ready for the next step.
Movement and collision
It is time we add an objective to our game, don’t you agree? Let’s create a small “maze” for the character to walk around and try to find the exit. First, we’ll define the maze’s walls:
...
  def initialize
    ...
    @walls = [
      Block.new(0, 0, 10, 600),
      Block.new(0, 0, 800, 10),
      Block.new(790, 0, 10, 600),
      Block.new(0, 590, 800, 10),
      Block.new(250, 0, 10, 400),
      Block.new(550, 200, 10, 400)
    ]
  end
  ...
  def draw
    ...
    @walls.each do |w|
      draw_quad(w.x, w.y, 0xff000000,
                w.x + w.w, w.y, 0xff000000,
                w.x, w.y + w.h, 0xff000000,
                w.x + w.w, w.y + w.h, 0xff000000, 0)
    end
  end
...
In the constructor, we defined a new variable, @walls, which will be a list of objects of the Block class. The Block class is provided by MiniGL and represents a rectangular block with collision capabilities. Its initialization takes as parameters the x and y coordinates of its top-left corner and its width and height in pixels, in this order.
After that, in the draw method, we’re traversing the walls list (@walls.each do |w|), passing a block to the each method, which will be run once for each element in the list, having the current element be represented by the block parameter “w” (indicated by |w|). For each element, we call draw_quad, a method from the game window itself that draws a four-sided polygon on the screen. The parameters are four sets of x and y coordinates and a color, one for each vertex of the polygon, and lastly the “z” coordinate. For instance, the first three parameters (w.x, w.y, 0xff000000) indicate that one of the corners of this polygon will correspond to the top-left corner of the block, and be drawn in black. We repeat the logic for the other three corners of the block, accessing its coordinates and width and height (w.w for width, w.h for height).
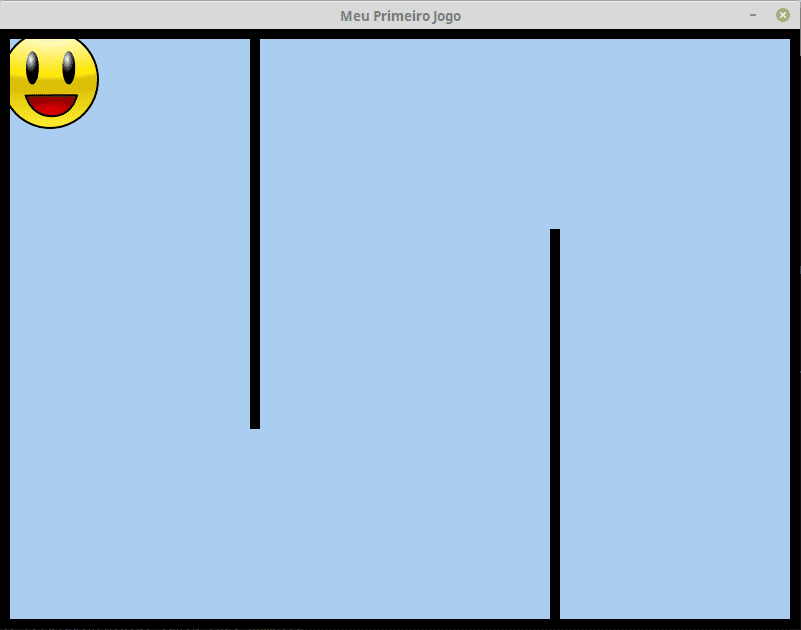
Run the game now and you’ll see that we created an outline by every border of the screen and a kind of “s”-shaped path, using those blocks. It can hardly be called a maze, but what matters is the concept. ;P
Now, we need to make the face move around the maze. In the previous post, we had created the following snippet in the update method:
...
  def update
    Mouse.update
    KB.update

    if Mouse.button_down? :left
      @x = Mouse.x
      @y = Mouse.y
    end

    @x += 1 if KB.key_down?(Gosu::KB_RIGHT)
    @x -= 1 if KB.key_down?(Gosu::KB_LEFT)
    @y += 1 if KB.key_down?(Gosu::KB_DOWN)
    @y -= 1 if KB.key_down?(Gosu::KB_UP)

    ...
  end
...
Let’s change it so that it controls the position of the sprite (however, we will remove the mouse actions, as we don’t want the player to simply click on the exit of the maze):
...
  def update
    KB.update

    @sprite.x += 3 if KB.key_down?(Gosu::KB_RIGHT)
    @sprite.x -= 3 if KB.key_down?(Gosu::KB_LEFT)
    @sprite.y += 3 if KB.key_down?(Gosu::KB_DOWN)
    @sprite.y -= 3 if KB.key_down?(Gosu::KB_UP)

    ...
  end
...
Note that we also changed the value of the position change to 3, because changing 1 pixel per frame is too slow. Test the game now and you will be able to move the face… but it will go through every wall. :(
Well, that was expected, because the Sprite class doesn’t do collision checking. It is aimed at drawing animated objects on the screen. Don’t worry, though, because MiniGL offers an easy solution to that too! Let’s upgrade our sprite to another class, GameObject:
...
  def initialize
    ...
    @sprite = GameObject.new(10, 10, 100, 100, :face, Vector.new(0, 0), 2, 3)
    ...
  end

  def update
    KB.update

    v = Vector.new(0, 0)
    v.x += 3 if KB.key_down?(Gosu::KB_RIGHT)
    v.x -= 3 if KB.key_down?(Gosu::KB_LEFT)
    v.y += 3 if KB.key_down?(Gosu::KB_DOWN)
    v.y -= 3 if KB.key_down?(Gosu::KB_UP)

    @sprite.move(v, @walls, [], true)
  end
...
First, let’s analyse the GameObject’s constructor:
- The two first parameters remain being the x and y coordinates of the top-left corner of the object.
- The two following are the width and height of the collision box of the object. Please note that all collision checking provided by MiniGL is based in rectangular boxes.
- The following parameter (
:face) is still the identifier of the image, working the same as in theSpriteconstructor. - The sixth parameter is receiving an instance of the
Vectorclass, which simply represents a point in a 2D space, i.e., a pair of coordinates. This parameter represents the object’s “image gap”, that is, the offset between the image and the “physical” position of the object. We will talk more about that in other occasions. Here, it’s initialized with zeroes, which indicates that the image will be drawn exactly at the physical position of the object. - Lastly, the last two parameters remain being the column and row count of the spritesheet.
After converting the sprite to a GameObject, we also changed the movement logic. Instead of directly changing the x and y coordinates (because that way we would always ignore collisions), we build a movement vector (v variable) and change its components. Finally, we call the move method of the object, passing as parameters the movement vector, the list of objects against which we want to check collisions (in our case, the @walls list), an empty list ([]), which is a parameter we will discuss later, and the value true, to indicate that the first argument is a speed/movement vector - the other possibility being a forces vector, in order to achieve more realistic, physics-based movements, which we’ll also cover in future posts.
Try running the game now and you’ll see that the face no longer goes through walls. Cool! We already have the main components we need to create a real game, the next step is to check if the player is at the exit of the maze and somehow show that he has succeeded. These will be the topics of the next post, so don’t miss out! See you then. ;)