Developing games with Ruby and MiniGL: Part 4 - text and buttons
Hello, developer friends! Welcome to part 4 of the game development with Ruby and MiniGL tutorial.
In this post, we will continue our “maze” game prototype that we began creating in the previous post, allowing the player to reach the end of the maze, showing on the screen that he won and offering a “play again” button, which will reset the game to its initial state.
As in the last post a lot of changes were made to the code and I haven’t included the final code, here’s the entire “game.rb” file, which will be our starting point:
require 'minigl'
include MiniGL
class MyGame < GameWindow
def initialize
super 800, 600, false
self.caption = 'My First Game'
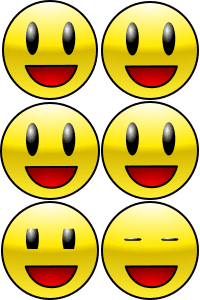
@sprite = GameObject.new(10, 10, 100, 100, :face, Vector.new(0, 0), 2, 3)
@blinking = false
@walls = [
Block.new(0, 0, 10, 600),
Block.new(0, 0, 800, 10),
Block.new(790, 0, 10, 600),
Block.new(0, 590, 800, 10),
Block.new(250, 0, 10, 400),
Block.new(550, 200, 10, 400)
]
end
def update
KB.update
v = Vector.new(0, 0)
v.x += 3 if KB.key_down?(Gosu::KB_RIGHT)
v.x -= 3 if KB.key_down?(Gosu::KB_LEFT)
v.y += 3 if KB.key_down?(Gosu::KB_DOWN)
v.y -= 3 if KB.key_down?(Gosu::KB_UP)
@sprite.move(v, @walls, [], true)
if @blinking
@sprite.animate_once([4, 5, 4], 7) do
@blinking = false
@sprite.set_animation 0
end
else
@sprite.animate([0, 1, 2, 3], 5)
if KB.key_pressed?(Gosu::KB_SPACE)
@blinking = true
@sprite.set_animation 4
end
end
end
def draw
clear 0xffabcdef
@sprite.draw
@walls.each do |w|
draw_quad(w.x, w.y, 0xff000000,
w.x + w.w, w.y, 0xff000000,
w.x, w.y + w.h, 0xff000000,
w.x + w.w, w.y + w.h, 0xff000000, 0)
end
end
end
MyGame.new.show
Here’s also the latest version of the “face.png” image (which must reside in the “data/img” folder, relative to the code file):
Update your files in case they’re different and let’s begin!
Detecting victory
First, we need to indicate on the screen where is the exit of the maze. Let’s include a new GameObject in the game, which will represent the goal, so that we can check if the player is in it (in order to do that, the goal must have physical dimensions, and that’s why we’re using the GameObject class). We’ll use the following image (save as “goal.png” in the “data/img” folder):

Now, let’s create it in the window constructor and draw it:
...
  def initialize
    ...

    @goal = GameObject.new(640, 480, 50, 50, :goal, Vector.new(-17, -17))
  end

  ...

  def draw
    clear 0xffabcdef
    @goal.draw
    @sprite.draw
    ...
  end
...
The main news here is the “image gap” parameter being initialized with Vector.new(-17, -17). Note that we defined the physical dimensions of the object as 50 by 50 (third and fourth parameters). However, the image used is 84 by 84 pixels, and the idea is to center the collision box inside the image. For that, we must draw the image translated 17 pixels to the left (indicated by -17 in the x coordinate of the vector) and 17 pixels up (y coordinate as -17) from the collision box. The objective of creating it this way is that the player needs to “enter” the goal a little before we consider that he won. The image below helps illustrate that:

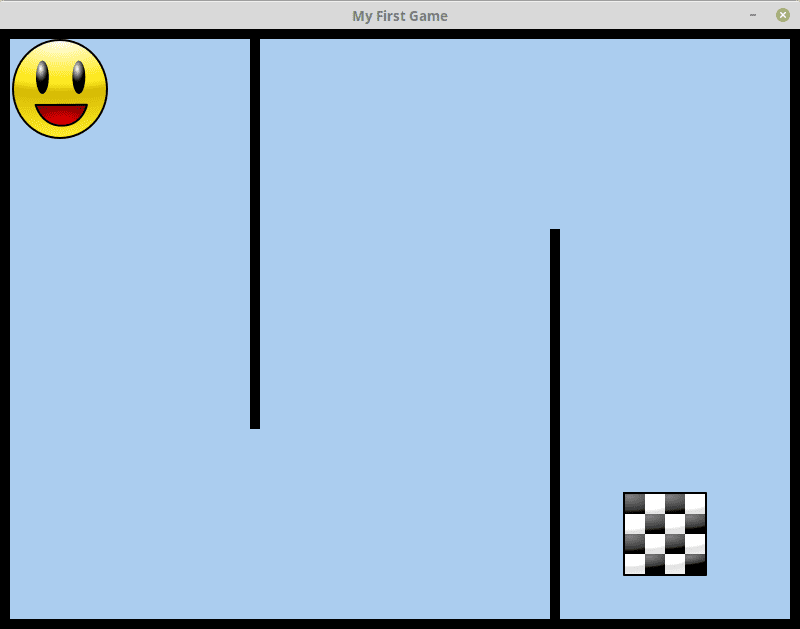
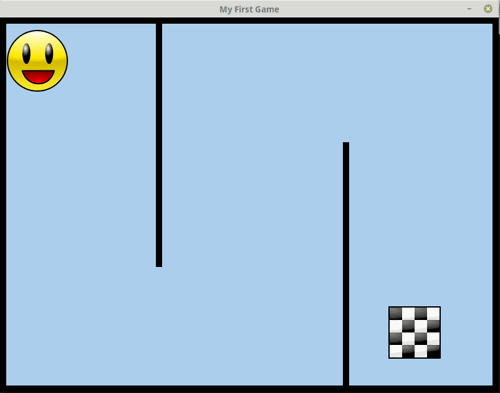
Another detail is that we put the instruction @goal.draw before @sprite.draw, so that the character is drawn “over” the goal, and not the opposite - that could also be achieved by using different “z” indices, but let’s keep things as simple as possible for now. Run the game and check it out:
Cool, we already have an area defined as the maze’s end. Now let’s check if the user reached the goal:
...
  def initialize
    ...
    @finished = false
  end

  def update
    ...

    unless @finished
      v = Vector.new(0, 0)
      v.x += 3 if KB.key_down?(Gosu::KB_RIGHT)
      v.x -= 3 if KB.key_down?(Gosu::KB_LEFT)
      v.y += 3 if KB.key_down?(Gosu::KB_DOWN)
      v.y -= 3 if KB.key_down?(Gosu::KB_UP)

      @sprite.move(v, @walls, [], true)
    end

    ...

    if @sprite.bounds.intersect?(@goal.bounds)
      @finished = true
    end
  end
...
We put the whole movement logic inside a block defined by unless @finished, so that the user can’t move the face once it reached the goal. We use the bounds method of both GameObjects to obtain their collision box and check if one intersects the other (through the intersect? method of the box itself). We set the @finished variable to true to indicate that this event happened.
Nevertheless, with this code alone, although we know when the player has reached the goal, there’s no feedback for the user about it - besides the fact that it can no longer move the character. We’re going to solve that problem with the help of MiniGL’s text features.
Drawing text
MiniGL provides the TextHelper class, which offers many different ways and options for drawing text. It is possible to write text with single or multiple lines, to align the text to the left, to the right, centered or justified, to draw a border or shadow effect with the text, besides, of course, defining the font, color and size. To use this class, we need first to load a font, which is a resource (as mentioned in the second post).
There are two ways to load a font: it can be a system font or loaded from a file (for instance ‘.ttf’). To load a system font:
...
  def initialize
    ...
    font = Gosu::Font.new(16, name: 'Font name')
  end
...
In the call above, you must replace 'Font name' with the actual name of a font from your operating system (for example, “Arial” or “Times New Roman” on Windows, or “DejaVu Sans” in some Linux distributions); the first argument is the font size. To load a font from a file - which is the recommended way for a game, so that you preserve the visual identity regardless of the platform - we can use the resource management class from MiniGL (Res):
...
  def initialize
    ...
    font = Res.font :font, 16
  end
...
The call above assumes you have a “font.ttf” file inside the “data/font” directory (following the conventions of the Res class, detailed in the second post). The second parameter, in this case, is the font size.
Once the font is loaded (by either of the approaches), we’ll create our TextHelper object (the only argument needed is the font object) and use it to write a message on the screen when the player reaches the goal:
...
  def initialize
    ...
    @text_helper = TextHelper.new font
  end

  ...

  def draw
    ...
    if @finished
      @text_helper.write_line 'You won!', 20, 20
    end
  end
...
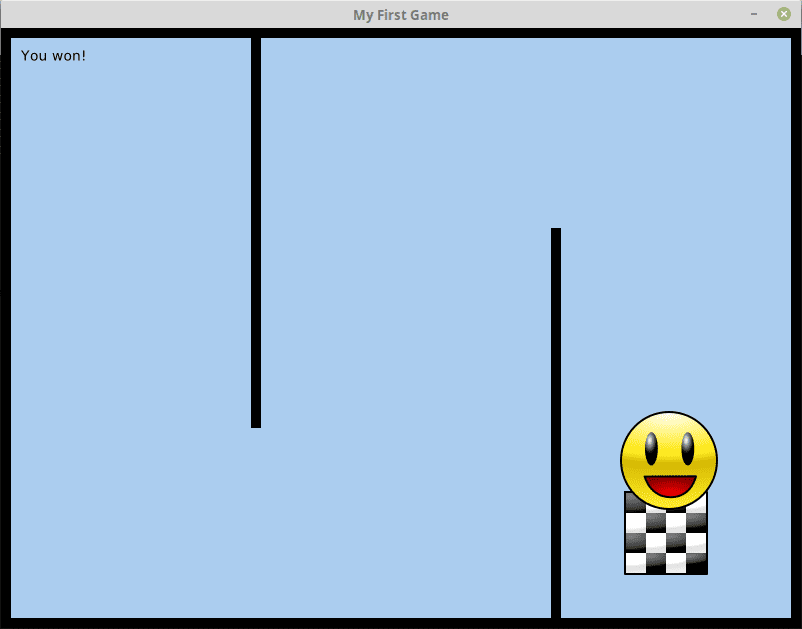
Here, we create the @text_helper variable to store our TextHelper instance and, in the draw method, we check the variable that indicates that the player is on the goal (@finished). In case it’s true, we then call the write_line method of the TextHelper, which draws a single line of text. The parameters are the text itself and the reference coordinates - in this case, with the default left alignment, these represent the top-left corner of the drawn text. Run the game, move the face to the goal and you should see something like this:
Nice, huh? But, this message definitely needs some more highlighting… Let’s raise the font size and explore some additional TextHelper options:
...
  def initialize
    ...
    font = Res.font :font, 48 # or Gosu::Font.new(48, name: 'Font name')
    @text_helper = TextHelper.new font
  end

  ...

  def draw
    ...
    if @finished
      @text_helper.write_line 'You won!', 400, 276, :center, 0xffff00, 255, :border, 0x000000, 2
    end
  end
...
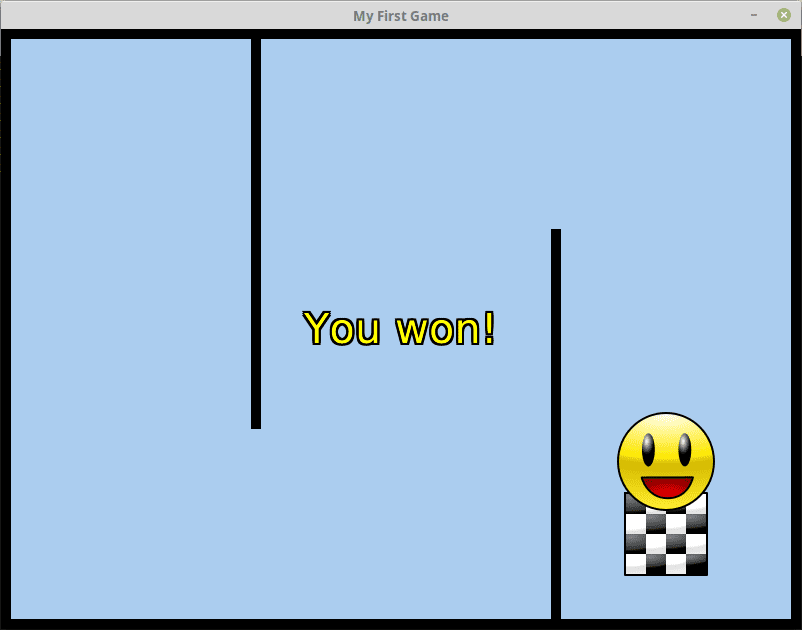
Way better, right? And what’s best: all of that by simply changing some parameters :)
Let’s examinate the changes:
- The font size was changed to 48 in its constructor.
- The x and y coordinates of the text were changed to 400 and 276, where 400 is the horizontal middle point of the screen, and 276 is the vertical middle point subtracted by 24, which is half the font size.
- The following parameter,
:center, is the text alignment. This determines how the text distributes from the reference coordinates. In the case of:center, the coordinates correspond to the top (vertical) and center (horizontal) of the resulting text. The other options are:leftand:right, in which cases the coordinates will represent the top-left and top-right corners of the resulting text, respectively. - The next parameters are the text color, here in the 0xRRGGBB format (not including the alpha/opacity component), and the opacity, indicated as a value from 0 to 255.
- Following, we pass the
:bordervalue to the “effect” parameter to indicate that the text must be drawn with border. There’s also the:shadowoption, to draw the text with a drop shadow (as you might have guessed). - After specifying the effect type, it is possible to specify its color (also in the 0xRRGGBB format), which in this case will be black (0x000000, or simply 0).
- Lastly, we’re specifying the effect’s “size”, which in the case of border is its thickness, and for shadow is the distance between it and the text.
The write_line method accepts yet other two parameters after these, which would be the effect’s opacity (from 0 to 255) and the “z” coordinate to draw in.
All’s well and good until here, but we still have a final step to take: we need to allow the player to play again without having to close and reopen the window. To achieve that, we’ll count on the help of another very useful class from MiniGL…
Buttons
Buttons are probably the most fundamental element of user interfaces. Mainly on PC games, they’re pretty commonly used. The MiniGL library offers the Button class, which allows for the creation of a fully functional button with few lines of code.
First, we’ll need the button’s image, which will be a spritesheet, for the button has various possible states, which can be visually distinct from each other - more specifically, there’s the default state, the state when the mouse is over the button, the state when the button is being clicked, and the disabled state. Thus, we’ll need a spritesheet with 4 pieces, representing each of these 4 states. These pieces must be arranged one below the other, in a single column, i.e., the spritesheet will have 1 column and 4 rows:
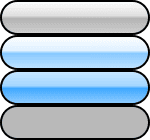
Save the image above as “data/img/button.png” and we’re ready to start:
...
  def initialize
    ...
    font2 = Res.font :fonte, 20
    @button = Button.new(325, 330, font2, 'Play again', :button) do
      @finished = false
      @sprite.x = @sprite.y = 10
    end
  end

  def needs_cursor?
    @finished
  end

  def update
    KB.update
    Mouse.update

    if @finished
      @button.update
    else
      v = Vector.new(0, 0)
      v.x += 3 if KB.key_down?(Gosu::KB_RIGHT)
      v.x -= 3 if KB.key_down?(Gosu::KB_LEFT)
      v.y += 3 if KB.key_down?(Gosu::KB_DOWN)
      v.y -= 3 if KB.key_down?(Gosu::KB_UP)

      @sprite.move(v, @walls, [], true)
    end

    ...
  end

  def draw
    ...
    if @finished
      @text_helper.write_line 'You won!', 400, 276, :center, 0xffff00, 255, :border, 0x000000, 2
      @button.draw
    end
  end
...
Let’s analyse what was changed method by method:
- In
initialize:- We created a new font,
font2, loaded in a smaller size to fit the button. - We created the button itself. The parameters are, in this order, the x and y coordinates (of the top-left corner, as usual), the font used to draw the button’s text, the text itself and the identifier of the image, as in the
SpriteorGameObject’s constructor. - Besides the constructor’s parameters, we pass in a block, which corresponds to the action of the button when clicked. In this case, we just change the
@finishedvariable back tofalseand move the face back to its starting position, redefining its x and y properties.
- We created a new font,
- In
needs_cursor?:- This method had been removed, but we declared it again and now it returns the value of the
@finishedvariable, which means the mouse cursor will be visible whenever this variable is true.
- This method had been removed, but we declared it again and now it returns the value of the
- In
update:- We also bring back
Mouse.update, in order to be able to detect the click on the button. - Instead of the
unless @finishedblock enveloping the movement logic, we now have an “if-else” block, where in the “if” part we update the button (it must only be shown and updated when the game is finished), and in the “else” part remains the movement logic, so that it still runs only when the game is not finished.
- We also bring back
- In
draw:- We include the call to
@button.drawinside theif @finishedblock, in order to draw the button only when the game is finished.
- We include the call to
And that’s all! Run the game again and appreciate the final result:
Here’s the updated “game.rb” file in its whole, for reference:
require 'minigl'
include MiniGL

class MyGame < GameWindow
  def initialize
    super 800, 600, false
    self.caption = 'My First Game'
    @sprite = GameObject.new(10, 10, 100, 100, :face, Vector.new(0, 0), 2, 3)
    @blinking = false
    @walls = [
      Block.new(0, 0, 10, 600),
      Block.new(0, 0, 800, 10),
      Block.new(790, 0, 10, 600),
      Block.new(0, 590, 800, 10),
      Block.new(250, 0, 10, 400),
      Block.new(550, 200, 10, 400)
    ]
    @goal = GameObject.new(640, 480, 50, 50, :goal, Vector.new(-17, -17))

    @finished = false
    font = Res.font :font, 48
    @text_helper = TextHelper.new(font)
    font2 = Res.font :font, 20
    @button = Button.new(325, 330, font2, 'Play again', :button) do
      @finished = false
      @sprite.x = @sprite.y = 10
    end
  end

  def needs_cursor?
    @finished
  end

  def update
    KB.update
    Mouse.update

    if @finished
      @button.update
    else
      v = Vector.new(0, 0)
      v.x += 3 if KB.key_down?(Gosu::KB_RIGHT)
      v.x -= 3 if KB.key_down?(Gosu::KB_LEFT)
      v.y += 3 if KB.key_down?(Gosu::KB_DOWN)
      v.y -= 3 if KB.key_down?(Gosu::KB_UP)

      @sprite.move(v, @walls, [], true)
    end

    if @blinking
      @sprite.animate_once([4, 5, 4], 7) do
        @blinking = false
        @sprite.set_animation 0
      end
    else
      @sprite.animate([0, 1, 2, 3], 5)
      if KB.key_pressed?(Gosu::KB_SPACE)
        @blinking = true
        @sprite.set_animation 4
      end
    end

    if @sprite.bounds.intersect?(@goal.bounds)
      @finished = true
    end
  end

  def draw
    clear 0xffabcdef
    @goal.draw
    @sprite.draw
    @walls.each do |w|
      draw_quad(w.x, w.y, 0xff000000,
                w.x + w.w, w.y, 0xff000000,
                w.x, w.y + w.h, 0xff000000,
                w.x + w.w, w.y + w.h, 0xff000000, 0)
    end
    if @finished
      @text_helper.write_line 'You won!', 400, 276, :center, 0xffff00, 255, :border, 0x000000, 2
      @button.draw
    end
  end
end

MyGame.new.show
Well… We managed to do a lot with shortly over 80 lines of code, didn’t we? And that’s what MiniGL is all about: achieve a lot writing little. However, the posts so far have demonstrated only a small fraction of what MiniGL has to offer! For some quick examples, the Button class offers many more customization options not shown here; the TextHelper class offers methods for drawing multiple lines of text within limited areas; there are other kinds of user interface controls besides buttons… and so on.
So, we still got a long way exploring other resources of the library. See you next time!